Sunday, 20 January 2013

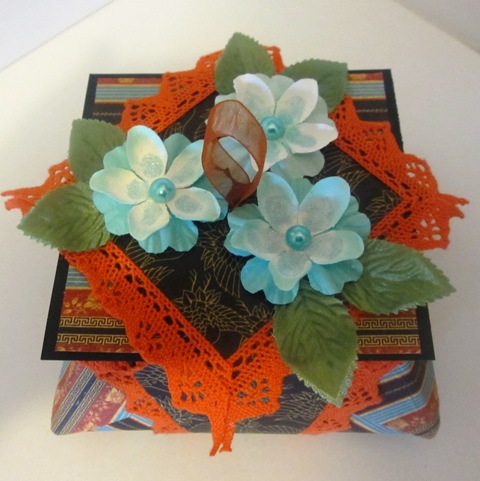
Gift Box and Card - Tutorial


This year I am on a mission to use up some of my lovely 12 x12 card/paper stock instead of just stroking it! The two sheets I have chosen for these projects are from the Prima Rondelle Collection. I thought it might be fun to take some photos along the way so you can see how I made them ... and maybe have a go at making them yourself! So here goes: Select 2 sheets of coordinating 12x12 cardstock
Trim off the label strip (if necessary)
Fold the edges of the paper into the centre and crease use a bone folder
Using a score board, score at 5 inches and 7 inches
Bring the scored line out to the edge of your paper and make a fold (so that you end up with a triangle shape).
Do this on all four score lines
You should end up with your cardstock looking like this
Use strong tape or glue on the triangular shaped area and stick into place
yYu should now have your basic box shape
I used the largest Spellbinder Labels 29 to cut a shape from the 2nd peice of cardstock
I folded the die cut shape in half
I then glued it to one side of the box
I attached two magnets to the flap and the front of the box to act as a clasp
I then simply decorated the box with a coordinating bow, some pearl sprays and a touch of Stardust stickles on the flowers
From the remaining cardstock I made a simple card and decorated it in the same way as the box
.... and there you have it, a coordinating gift box and card
Happy crafting!

Saturday, 19 January 2013

Alphabet Challenge - letter V


The Craft Barn have set up a fortnightly prize challenge, based on an altered dictionary type theme. Those that know me, will know that I have never really got on well with journaling or altered projects, so this year I am trying to step out of my comfort zone and give it a try! The first letter that the Craft Barn have chosen is the letter V, so I have chosen the word Valentine - definition = a card or gift expression of love sent, often anonymously on Saint Valentines Day. Here is my first ever attempt at a couple of journal pages! Please be kind!!!!!! lol
I used Memory box dies to cut the letters and hearts, then added glossy accents and liquid pearls. I also used a dotty mask and some perfect pearl sprays but you can't really see it on the picture. Also used a touch of vintage photo distress ink around the edges. This is a fortnightly challenge so will last for a year ... whether or not I last the same amount of time is another question! lol There is a link to The Craft Barn on the right of my blog, feel free to click on it and it will take you to their web page where you can find links to their blog and this challenge. Happy crafting xx

Friday, 18 January 2013

Origami Box


Was feeling at a bit of a loose end today, didn't want to make any cards, so made this - a very simple origami box made with a couple of 12 x2 sheets from the Graphic 45 BiC:

Sunday, 13 January 2013

Beautiful Little Birdhouse


Treated myself to a Bird House Kit from Pink Tulip, my lovely local craft shop in Spernal Ash, nr Studley in Warwickshire. The kit was designed by the same local craftsmen (Candy Box Crafts) that designed the advent calendar I made in an earlier post and was of the same fabulous high quality and fitted together perfectly.
 
 
I decided to finally use a few sheets of my precious Graphic 45's "Little Darlings" 12 x12 collection, (am a huge Graphic 45 fan) and am really pleased with the result.


For the roof of the birdhouse, I cut lots of 1.75 inch circles using my EK Success circle punch and overlapped them to creat a slate roof effect. I also edged each tile with Stardust stickles (my favourite one as it is so versatile). I then edged the roof with some narrow faux stiched effect pale green ribbon.
 
 
I used a  Spellbinder die to decorate the little door way, a Memory Box die to cut some foliage, and a small floral punch to make extra petals for my flowers.I also cut out a few of the butterflies from scraps of left over paper.


I used some Shabby Shutters Distress ink around he edges of the bird box to give it a more shabby chic kind of look. Hope you like it as much as I do! Am really enjoying these altered projects and can't wait to see what new kits Pink Tulip get in store next!
 

Thursday, 10 January 2013

Valentines 2013


Made a very quick Valentines card this evening. Cut 9 hearts out using the Tonic heart punch, I used vintage photo distress ink around the edges and then matted these onto a cicle cut out with an EK Success 1.75inch punch (these were also distressed with vintage photo distress ink. The 9 circles were then matted on to a piece of old Kanban printed cardstock and finally matted onto a white square card. Simple but quite effective I think. Both of the punches listed above are absolutley brilliant to use - no issues whatsoever with card or paper getting stuck in them like another brand I could mention - lol will add more Valentines cards to this post as and when I make them - love and hugs Debs x

Tuesday, 1 January 2013

Getting Ahead for Xmas 2013

I was tidying up my little craft room yesterday and came across a huge pile of xmas papers and  wooden embellishments that I had forgotten I had bought! So I have set myself a couple of goals: a) to use some of them up  and b) not to buy any new xmas stash in 2013 ... think I will be able to achieve goal a) but am not so sure on goal b) ...lol

Anyway have made a start with some very quick and easy cards - these are mini cards 3.5 x 3.5 and will be used for work xmas cards rather than my specials! Just matted and layered a small wooden embellishment onto a die cut scalloped circle, with was in turn matted and layered onto small squares of decorative paper &card stock. Hope you like them!


Sunday, 30 December 2012

A Place In Time - 2013 Calendar


I decided to make myself an 8x8 calendar using the totally stunning "A Place In Time" collection by Graphic 45. Used a blank ring bound easel album as the base and then just played! It was so nice to relax and do something crafty just for myself, and have spent a fabulous two days in my little box room making it. Hope you like it! Need to have a serious tidy up of the desk now so that I can play with the Ladies Diary Collection as I need to use it before the release of the French Country collection in Feb ..... cant wait for that one either!(so love Graphic45!)


Thursday, 8 November 2012

One sheet of 12 x12 ...


Whilst on one of my crafty visits to Pink Tulip in Spernal Ash (nr Studley) I treated myself to a few sheets of new xmas paper - Winter Wishes by Echo Park. These six very simple 6x6 cards were made with a few sections from just one of the 12 x12 sheets. I love the colours and the variety of the images and had great fun making them. I think I can easily make another 4 cards out of what is left of the one 12 x12 sheet, so really economical for those of you on a tight xmas card budget! (I will post pictures of the other cards as soon as I complete them.)

Wednesday, 7 November 2012

Out with the old .....


I am trying very hard to use up some of my old xmas stash to make quick and easy xmas cards for work. I used some old xmas papers and a holly punch to make these simple 6 x6 cards


Then I came across a couple of 12 inch strips of poinsettia's that I bought from the Range (I think?) - I just cut them and matted and layered them to make these very simple cards - there are actually another 3 of these but I couldn't fit them all in on the photo!