Cut 2 pieces of cardboard (or grey board or mount board) measuring 5 inches by 7 inches
and 1 piece measuring 7/8th inch by 7 inches

Glue the pieces to a piece of 12 x 12 paper, remember to leave a gap of approximately 1/8th inch between the covers and the spine, so that your paper does not tear when you fold the covers
 |
| Add caption |
Trim off the excess paper

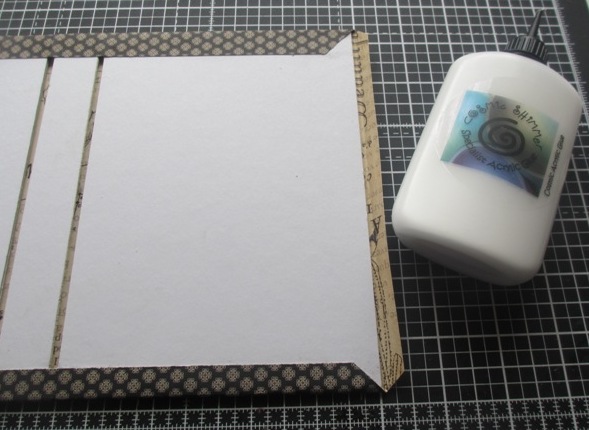
Trim the four corners as shown, don't cut it right up against the board, leave about an 1/8th inch of paper showing in the corner.

Fold all four edges up around the board

The glue the edges down with a wet glue, You can use double sided tape if you wish, but if you do use a strong one such as red line tape.
You should end up with something that looks like the picture below

Next using a second sheet of 12 x 12 paper, cut a strip that is 6 3/4 inches wide. The from that strip, cut 2 pieces that measure 4 3/4 inches x 6 3/4 inches. You will then be left with a piece that is 2 1/2 inches by 6 3/4 inches.

Using the thinner strip, cut a narrow slit in the middle about two inches doen from the top (I cut a larger slit shown in the photo below, just to show you where it goes) The cut a piece of ribbon or seam binding approximately 3 inches long. (This will be used to make the pen holder)

Fold the ribbon in half and thread both ends through the slit, Then secure the ends on the reverse using strong red line tape. Make sure the loop is big enough for your pen to fit through

Glue or tape the paper to the middle section (or spine) of your notebook holder.

Take one of the other pieces of paper that you cut and glue it to the left hand side of the inside cover

Take the other piece of paper and fold about half an inch back on itself

Then glue the folded strip down (using glue or double-sided tape)

Place a line of glue around three edges of the paper as show , don't put any glue on the strip you have already glued down

Then glue this piece of paper to the right hand side of the inside cover. This will then form a pocket into which you can slot your notepad


Depending on what type of pen you have, you might want to decorate it to match. I simply cut a small strip of paper to cover the central section, wrapped the paper around tightly and glued it into place


Then add your decorated pen to your holder

From the paper you have left, cut a square 4 inches by 4 inches, and cut in half - corner to corner - making two triangles

Glue one triangle to some coordinating cardstock

Trim leaving an equal border of card stock all around.

Place glue or tape on two side of the triangle.

Then attach to the bottom corner of the inside cover to form a small pocket

Fold your cover and close your notebook holder

Decorate the cover how ever you wish

Hope this tutorial is easy enough to follow. If you get stuck please feel free to message me via the comments box below and I will try to help you.


