Saturday, 31 August 2013


Thursday, 29 August 2013

Monday, 26 August 2013
Graphic 45 Bohemian Bazzar Caddy
I seem to have ended up with lots of cardboard wine carriers (you know the ones you get for free at the supermarket).

I was going to throw them away, when four little words seemed to jump out at me:

So I did! I used a few sheets of Graphic 45 paper from the Bohemian Bazzar collection to décor\te the inside and outside of the caddy, added a decorative border (using an EK Success punch) and a few white flowers and punched matching centre's from the G45 paper and added a few little adhesive gems.


Hope you like it!

I was going to throw them away, when four little words seemed to jump out at me:

So I did! I used a few sheets of Graphic 45 paper from the Bohemian Bazzar collection to décor\te the inside and outside of the caddy, added a decorative border (using an EK Success punch) and a few white flowers and punched matching centre's from the G45 paper and added a few little adhesive gems.

Hope you like it!
Sunday, 25 August 2013
Graphic 45 Birdsong Box
A while back I made a mini album with the Graphic 45 Birdsong collection, and whilst having a sort out of my craft room today I decided it might be a good idea to make/decorate a matching box to put it in. Here is the result:


If you would like to see pictures of the album I made, here is the link::
http://debsdotsdashes.blogspot.co.uk/2013/03/graphic-45-birdsong-collection.html


If you would like to see pictures of the album I made, here is the link::
http://debsdotsdashes.blogspot.co.uk/2013/03/graphic-45-birdsong-collection.html
Saturday, 24 August 2013
Graphic 45 Nutcracker Sweet and Prima Doll Stamp Tag
This is the fourth tag in a set of six,that I am making have made with the gorgeous Graphic 45 Nutcracker Sweet papers and a Prima Doll stamp.


Saturday, 17 August 2013
Kaisercraft Mini Album
Having watched lots of You Tube videos on how to make a mini album using empty toilet rolls I thought I would finally give it a go. Bit of a tip I picked up - iron your toilet rolls flat, sounds crazy I know but it does make them easier to decorate. As I had someone in mind who I was going to give the album to, I chose a quite masculine paper collection by Kaisercraft. Here is the result


And yes, I gave it to the fabulous Mr Nigel May, who I met in Evesham today


And yes, I gave it to the fabulous Mr Nigel May, who I met in Evesham today
Thursday, 15 August 2013
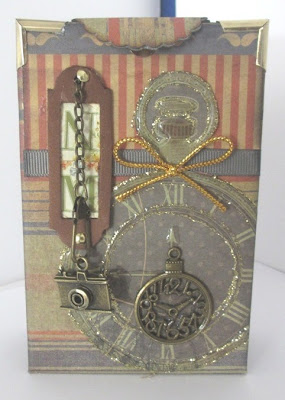
Time Flies Collection by Craftwork Cards
It's been a while since I bought any of the 8 x papers by Craftwork Cards, but when I saw the new Time Flies Kit/Collection I just could not resist it! I took an empty cardboard box approx. 8 inches by 5.5 inches x2 inches deep (you know the kind that comes from a certain shopping channel renowned for it's quality, value and convenience - lol!) and covered the outside in purple card stock.
I then chose a few sheets of the Time Flies collection, distressed the edges with Seedless Preserves distress ink and covered the lid and the inside of the box. I cut out watch fobs from another sheet of paper and added glossy accents around the edges of the watches to give a little bit more dimension and I cut circles from clear acetate to make the watch glass before decoupaging them onto the box with thin strips of 3D foam
I added a Graphic 45 lock, a small key (both of which were distressed with Seedless Preserves distress ink and some cream paint) and a small ribbon bow along with a few paper roses. The feet of the box were wooden drawer knobs (very kindly donated by Sheila from Pink Tulip Creations) which were painted with cream paint and them had the same distress ink added.
Hope you like it!


Sunday, 11 August 2013
Graphic 45 Ladies Diary and A Prima Doll Stamp
The third tag in my series of six, this time using the Ladies Diary collection by Graphic 45 and another Prima Doll stamp.


Saturday, 10 August 2013
Graphic 45 Secret Garden and Prima Doll Tag
This is the second of a set of tags I am making using the Graphic 45 collections and the original set of Prima Doll Stamps.


Thursday, 8 August 2013
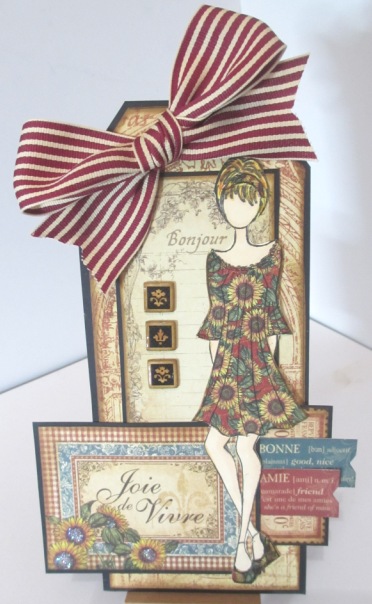
Graphic45 French Collection and Prima Doll Stamp Tag
This months challenge Ali-Craft is to create something using one of the Prima Doll stamps.
I have combined one of my favourite doll stamps with the some of fabulous French Collection papers , cut-a-parts and chip board elements from Graphic 45.
I inked all the edges with Brushed Corduroy Distress ink then did a little simple matting & layering onto black cardstock. Then finally added a little glossy accents to the small chipboard elements and some stickles to the centre of the sunflowers
Am so happy with how it turned out that I may make some more using other Graphic 45 collections ... so what this space! lol
 .
.
I have combined one of my favourite doll stamps with the some of fabulous French Collection papers , cut-a-parts and chip board elements from Graphic 45.
I inked all the edges with Brushed Corduroy Distress ink then did a little simple matting & layering onto black cardstock. Then finally added a little glossy accents to the small chipboard elements and some stickles to the centre of the sunflowers
Am so happy with how it turned out that I may make some more using other Graphic 45 collections ... so what this space! lol
Sunday, 4 August 2013
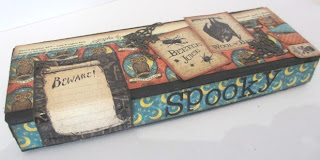
Graphic 45 Steampunk Gift Boxes
I needed to use up all the bits of paper left over from my G45 workshop, so I painted some boxes (appro x 2.5inches by 7 inches) with black acrylic paint then went to town decorating them inside and out. Am really pleased with them. Not sure what kind of treat will go inside as yet (well Halloween is a while away!) but will think of something suitably spooky.


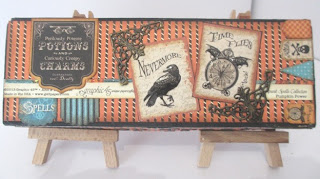


Graphic 45 Steampunk Spells Folio Album
Had a fabulously crafty day yesterday at another Graphic 45 workshop with the brilliantly talented Clare Charvill. The project we made this time was a beautiful folio album with rounded corners,
flippy out pages and decorated with the gorgeous Steampunk collection from Graphic 45.
Mine is still a work in progress as I need to add a few more bits and pieces to it, but I thought I would share a few photos of it with you:


flippy out pages and decorated with the gorgeous Steampunk collection from Graphic 45.
Mine is still a work in progress as I need to add a few more bits and pieces to it, but I thought I would share a few photos of it with you:


Friday, 2 August 2013
Thank You Emily!
A very rare and special thing happened to me today - I was sent a beautiful hand crafted "Thank You" card from a fabulous young (aged 9) crafter called Emily, in return for giving her some of my excess crafty stash.
I proudly displayed the card on my desk at work all day today, and thought it might be nice to share a couple of photo's with you all on my blog, so here goes:

The card was a fabulous box design, with little mirrored and heart shaped accents along with some stunning sunshine yellow fabric flowers on it. As you can all see there was also a pretty topper in the centre of the card with a lovely message on it.

The back of the box card was also very cleverly designed by Emily, so that the card would stand up by itself. I was very impressed by this design feature and may even use it on some of my own cards in the future!
Many thanks Emily for making this for me, and well done. I hope to see lots more of your crafty designs over the summer holidays xxxx
I proudly displayed the card on my desk at work all day today, and thought it might be nice to share a couple of photo's with you all on my blog, so here goes:

The card was a fabulous box design, with little mirrored and heart shaped accents along with some stunning sunshine yellow fabric flowers on it. As you can all see there was also a pretty topper in the centre of the card with a lovely message on it.
The back of the box card was also very cleverly designed by Emily, so that the card would stand up by itself. I was very impressed by this design feature and may even use it on some of my own cards in the future!
Many thanks Emily for making this for me, and well done. I hope to see lots more of your crafty designs over the summer holidays xxxx
Subscribe to:
Posts (Atom)