Monday, 27 May 2013


.JPG)
.JPG)


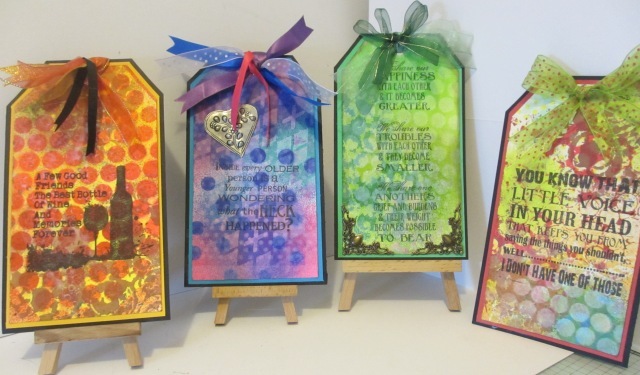
My Very Inky Fingers ...
Those of you who know me, will know that I do not like messy crafting at all. I'll quite happily fussy cut paper and mat and layer until the cows come home but put inks, stamps &masks in front of me and I break out in a cold sweat. So with shaking hands and after many deep calming breaths I am proud to say that today not only did I get REALLY messy for the very first time but I also used 17 out of 18 Dylusion inks. Felt completely out of my comfort zone but managed to survive the experience. Here is the evidence of my inky fingers and photos of what I came up with. Happy Crafting xx


Sunday, 26 May 2013
Free Crafting Stash ....
... if you fancy some completely free crafting stash (as shown in the photos below), all you have to do is become a follower of my blog (existing followers can enter too) and leave a comment on this post between now and Friday 31st May 2013. I will pick a winner at random and post your stash out to you ... simples! (Am having a really good sort out ... so more photos will be added as I come across extra stash to give away!)


.JPG)


.JPG)

Sunday, 19 May 2013
Graphic 45 "French Country" Mini Matchbook and Album
Just a very quick post for this evening: I bought a small (3 inch x 5 inch x 1.5 inch) G45 matchbook box the other day and have decorated it using the G45 French Country collection. I have also made a mini album that fits inside the matchbook. Hope you like it.

Started off by painting the box black and then covering it in strips of a piece of 12 x12 Deja Vu from the G45 French Collection

The large brass floral embellishment was painted with some of the new Ranger Patinas in Victorian Gold, Earth and Aged Bronze, (to try to make it look more like a sunflower) really love the effect these Patinas give and will definitely be doing more projects with them. Also added a bit of Treasure Gold.

Covered the inside of the drawer and distress all the edges with Vintage photo distress ink


Am really loving all the fab brass embellishment's that are available now, in fact I can't get enough of them. Have used loads of them on this project and love the way they look.

Side View
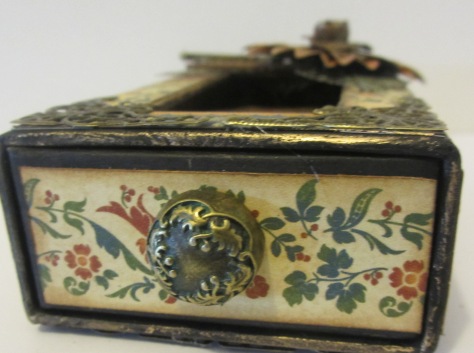
Another G45 staple used here - metal button


Bottom of box

I kept the inside of the album fairly simple as I wanted to show off the beautiful papers.


I cut out a couple of sunflowers and added a touch of glossy accents and stickles.

Hope you have enjoyed looking at all the photos - till next time Happy Crafting

Saturday, 18 May 2013
From Plain To Fabulous
OMG, I have fallen totally in love ... with Gilding Flakes, Treasure Gold and Brass embellishments!!! I decided a while ago to make something just for me and bought a small single drawer kit from my fabulous usual suppliers .... Candy Box crafts via Pink Tulip!
I assembled the kit and decided to go mad and cover the whole thing in fabulous Indigo Blu Gilding flakes (Yorkshire Dales) and used Classic Treasure Gold around the edges . I selected a few floral/foliage type brass embellishment's on which I rubbed some Treasure Gold in both Classic Gold and Aquamarine before using them to decorate the top of the box and the drawer front. I also added tiny little adhesive pearls onto the centre of some of the flowers and a gold bow.
I am so happy with this little box and have the perfect place for it in my guest bedroom, where it will tone beautifully with my colour scheme. Off to play with some more brass embellishment's now and my new Ranger Patina's - can't wait to see what I can do with them. Happy Crafting.


Wednesday, 15 May 2013
Pion Design
Have been playing with another couple of sheets of 12 x12 from Pion Design, really love this range of papers. The card is a simple Z-folded 8 x 8. The tags were cut from one of the sheets of 12 x12 and were distressed with Milled Lavender ink. I wrapped some bakers twine and jute cord around a couple of the spools (also cut from the piece of 12 x12) and added 12 small white buttons to another cut-apart and coloured them with a lilac Promarker. Everything as then matted onto some black card stock and arranged on the card. I added a few ribbon bows and a small brass scissor embellishment.
Hope you like it xx

Hope you like it xx

Tuesday, 30 April 2013
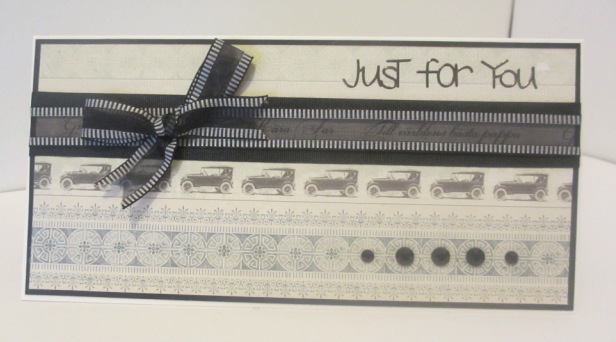
A New Range of Papers
I have recently been introduced to a new paper range by a company called Pion Design.
Pion Design is a manufacturer of high quality scrapbooking papers made in Sweden. Their unique paper collections are of a timeless design with a romantic and vintage feeling.
The standards of Pion Design are impeccable, and have been designed with attention to every little detail.
Pion Design has a true passion for paper crafting and their main goal is to provide crafters with inspiring products along with endless possibilities.
link to the Pion website: http://piondesign.se/paper-collections/
Here are the cards I have made so far with just two of their beautiful 12 x12 papers - hope you like them xx


Sunday, 28 April 2013
Graphic 45 - " Magic of Oz" Zig Zag Album
With all the fabulous new Graphic 45 collections that have been (and are soon to be) released this year, I have set myself a little challenge to try and use up some of the older collections that I have previously just sat and stroked.
So having watched yet another one of Clare Charvill's totally inspiring You Tube videos (huge congratulations by the way to Clare for making it onto the Graphic 45 DT for another year.) I decide to use up some of the Magic of Oz 12 x12 collection on this simple zigzag album. (also inspired by one of Clare's easy to follow tutorials)
I used some of the new G45 kraft tags (in regular & large) and simply changed the colour with a black Promarker - love these tags and am going to buy some more as I can see me using them a lot.
Hope you like it, it is the first zigzag style album I have made, but definitely wont be the last. Hope you enjoy looking at the photos.
Happy crafting
xx


Wednesday, 27 March 2013
Three Lovely Little Beach Huts
Only a very short post from me this evening. I really must try to have a break from all the altered projects I am making , or I will forget how to make cards - lol. But I just couldn't resist decorating another fabulous MDF kit designed by those clever Candy Box Crafts guys (and available from by Pink Tulip).
The Everyday Moments paper collection by Teresa Collins was simply perfect for this project. The muted yellow and blues toned beautifully with the cream and navy and conjured up lots of happy seaside memories from when I was a young girl.
I used three push pins (that were coloured with a Midnight Blue Promaker) to make door handles and added a co-ordinating Craftwork Cards Candi to make the door knobs. The door decorations came from a sheet of Matching Teresa Collins 3d stickers and a little pale blue Ric-Rac was added around the door frames.
Hope you like it - Happy Crafting xx


Tuesday, 19 March 2013
Distress Ink Storage
Over the past few weeks, I have been growing more and more frustrated with the way I have been storing my TH Distress Inks. I had two boring plastic storage tubs on a shelf, and could never remember which tub stored which colours (it must be sign I am getting old).


So you can imagine how happy I was when I walked into Pink Tulip, my lovely local craft shop and discovered that they are now selling self assembly Distress Ink storage kits. I am sure that everyone at Pink Tulip has psychic powers as they always seem to know what I want, without me having to say a word. The fabulous kits are designed and produced by Candy Box Crafts (two extremely talented craftsmen) here in the UK. (link to their website on the right of this blog). The kits are made from quality MDF and have been specially designed to fit Distress Inks and Adirondack style inks perfectly.

The kits all come with full instructions and fit together like a dream, due to the precision laser cutting of all the pieces.


As you can see I even have room to store a few blender tools and a few more ink pads, when I get the urge to buy some more. I am really pleased with my new storage and wholeheartedly recommend it to everyone. Pink Tulip are now offering mail order on their kits. If you click on the link on the right of my blog it will take you to their website. If you then click on "New Products" you will find details of all the fabulous kits they have on offer. If you can't see the kit you want, then please feel free to give them a call or send them an email as they will be more than happy to assist you.
Happy Crafting xx


So you can imagine how happy I was when I walked into Pink Tulip, my lovely local craft shop and discovered that they are now selling self assembly Distress Ink storage kits. I am sure that everyone at Pink Tulip has psychic powers as they always seem to know what I want, without me having to say a word. The fabulous kits are designed and produced by Candy Box Crafts (two extremely talented craftsmen) here in the UK. (link to their website on the right of this blog). The kits are made from quality MDF and have been specially designed to fit Distress Inks and Adirondack style inks perfectly.


The Distress Ink kit holds 40 ink pads and the Adirondack kit holds 32 ink pads. The size of finished storage kit is approx 16.5 inches wide, by 7 inches tall, by 3.25 inches deep and they have two small keyholes in the back so that they can be wall mounted. Both kits are the same overall size so are easily stackable. (Price of each kit is £14.95 - plus £2.50 P&P if you don't live local to the shop)

As I said earlier, the kits fit together beautifully due to the precision laser cutting of all the pieces and are simply glued together with PVA wood glue. As I have all 48 current Distress Inks, I bought two Distress Ink kits, and adapted the second one slightly so that it holds the rest of my Distress inks along with my small collection of Memento/Versamark & Adirondack ink pads. I have uploaded a few piccies below so you can see how I decorated them:


I kept the decoration quite simple, I used white acrylic paint to cover the exposed edges, then used a couple of sheets of Prima 12 x12 paper from the fabulous new "Hello Pastel" Collection, to decorate the sides and the top. I left the back of the units blank as the back will be hidden once wall mounted. But if you plan to have a free standing unit, then there is nothing to stop you decorating the back too.


As you can see I even have room to store a few blender tools and a few more ink pads, when I get the urge to buy some more. I am really pleased with my new storage and wholeheartedly recommend it to everyone. Pink Tulip are now offering mail order on their kits. If you click on the link on the right of my blog it will take you to their website. If you then click on "New Products" you will find details of all the fabulous kits they have on offer. If you can't see the kit you want, then please feel free to give them a call or send them an email as they will be more than happy to assist you.
Happy Crafting xx
Subscribe to:
Posts (Atom)