Showing posts with label Graphic 45. Show all posts

Thursday, 9 April 2015

Graphic 45 Time To Flourish Project Sheets

Sometimes I have lots of ideas running through my head and crafting comes easy, but on other occasions I really seem to struggle. When my mojo runs low I turn to the experts on the Graphic 45 blog and create something using their wonderful project sheets. This week has been  very low mojo week, so I downloaded the Time To Flourish project sheets for January, February and March and made the following 6 cards. I love them and plan to make the rest of the years card projects, by the end of the year I will have 24 cards, that I will split into two sets and give away as crafty gifts.

Hope you like them:


Tuesday, 7 April 2015

Faux Book Storage Idea from Pinterest

You have probably come to the same conclusion as me: it is impossible to have just a quick look on Pinterest. Anyway whilst having a browse  this weekend I happened upon a link to a video by the amazing Olga Struk:

https://www.youtube.com/watch?v=8ysAy51SLes

As I adore finding ideas for storage solutions and Graphic 45, I just had to have a go at making them. I adapted the idea slightly by using Pringles tubes cut in half lengthways to make the curved spine of the faux books. I also made the covers slightly bigger (4.5 inches by 5 inches).

They were so easy to make and now I have homes for a few more crafty supplies. Hope you like them - Happy Crafting.


Saturday, 4 April 2015

Graphic 45 - Baby to Bride Collection

It's been far too long since I made any greeting cards, so have had a lovely evening creating two simple cards with the Graphic 45 Baby to Bride Collection that was recently re-released.Whilst the name of the collection lends itself top baby or wedding cards, the collection is versatile enough to be used for any type of greetings card.

I added lace, ribbon, paper roses, twine,wooden embellishments and adhesive pearls and am so happy with how they turned out. Hope you like them too - happy crafting xx


Saturday, 24 January 2015

Craft Room Tour

Have had a huge sort out and tidy up today, can honestly say I don't think my craft room has been this tidy in ages, not only can I see my desk but the floor is clear too .... yaaaay.

A few of you have asked to see where I craft, so at the risk of boring you I thought I would post a few pictures. The room measures approx 5 ft by 6 foot, there is only just enough room for a desk/chair so I try to utilise the wall space as much as I can.

My projects are generally photographed on the glass mat on top of my printer.

I store my dies on a couple of old cork noticeboards that have been covered with magnetic sheets I , managed to get the in my local £1 shop (2 for £1).

 My 48 distress inks are stored in an mdf caddy from Candy Box Crafts,, but this will change shortly  to the new bigger one that Candy Box Crafts have designed, which will hold 60 distress inks (in readiness for the new colours coming out this year). The majority of my stamps are kept in the white ring binders, but I also have a large box to store the rest of them and next door to my stamps are my very precious G45 12 x 12 pads. 

Bit of a murky photo, but this is where I craft, write my blogs and chat on FB etc - depending on how untidy I get, I can sometimes be working in just a 10 inch square of desk! lol  

I use all the space under the desk to store (from left to right ...) my offcuts of coloured cardstock, alterable items, material, adhesives, embellishments, stencils/masks and more 12 x 12 paper and cardstock than I care to admit to! 

These are my favorites at the moment, 3 masks and 3 sets of stamps by the amazing Ryn - I will show you what I've been up to, in a future blog post. The Designs byRyn stamps are now available in the UK from Pink Tulip  Creations,Spernal Ash Nurseries/Alcester Road, Studley B80 7PD, Phone:01527 852052  - they sadly don't have an online shop but they will mail items to you if you order over the phone. 

How many pairs of scissors do I need? - funny how they all seem to disappear when I need them.

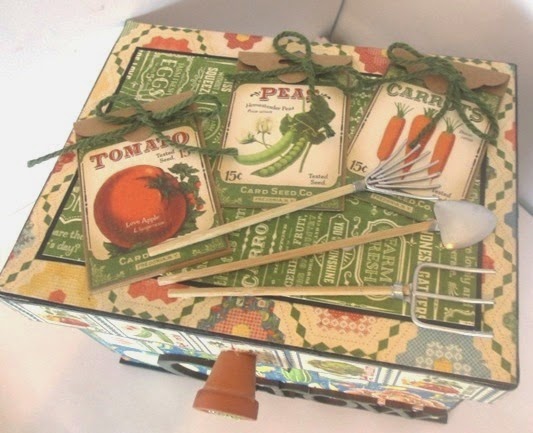
A little bit of home made stationary, using G45 - of course 

I love all things pink - so I just had to get the limited edition Hougie board in aid of Breast Cancer Care, but will admit I us the smaller board more and that one was a free gift with a craft magazine.

These are the 4 tubs on the 3rd shelf up, containing more ribbon & lace than I will ever need so I am on a ribbon and lace ban until I can reduce the number of tubs to 3.

Also have 3 tubs full of punches, mainly Martha Stewart, Woodware, EK Success and Stampin Up. 

So that's it folks a very brief tour around my craft room. If there is anything you would like a closer look at, just post a comment and I will see what i can do.Am off for a little bit of a craft now. so till next time - have fun xx

Saturday, 10 January 2015

Triple Mini Photo Frame, from guess what ......

... three square mdf coasters from Candy Box Crafts of course.

Ok, I admit it, I seem to be getting a little obsessed with mdf coasters at the moment, but they are just so very versatile.

To make the photo frame, I covered the front of each of the 3 coasters in paper. (I used the brown and cream script sheets from the 6 x 6 "Time To Celebrate" Graphic 45 pad.)

I then cut 3 squares of cardboard approx 3/8ths of an inch smaller than the coaster, out of which I cut a 2 inch square to make a small frame. I covered the frames in a coordinating paper from the 8 x 8 "Time To Celebrate" Graphic 45 collection and attached four ornate metal corners to each frame.

The frames were then attached to the coasters using 3D foam on the bottom and left & right sides,  don't use any foam on the top of the frame as you need to leave a gap in order to insert a photo.

I used card to make hinges and attached the coasters all together. I then used a square of decorative paper to cover the back of the coasters. Hey presto a triple mini photo frame.


Monday, 29 December 2014

Tealight Box - Tutorial

Cut a piece of cardstock or paper - 7.75 inches x 5.25 inches   (19.5cm x 14cm)
Score on the LONG side at 3/4 inches and 7 inches (2cm & 17.5cm)
 Score on the SHORT side at 3/4 inch, 2 1/4 inches , 3 inches , and 4 1/2 inches  (2cm, 6cm, 8cm , 12cm)

 Burnish all the score lines

Cut away the sections as shown in the photo

Using wet glue or DST, fold and stick the small tabs as shown to form box

Fold the rest of the card over to form the box lid

If you wish to decorate your box,you will need two strips of decorative paper measuring 1 3/8 inches by  x 6 inches (3.5cm x 15cm)


To make the belly band to go around the box, cut a strip of paper 1 inch wide by approx 6 inches


Wrap the strip around the box, cut so that the two ends overlap and glue into position, taking care not to glue the belly band to the actual box

Cut a small tag using a die or a punch

Add a handmade bow and attach your tag

You can of course just use a piece of ribbon to seal your box, if you don't want to make the belly band and bow.


The box is big enough to hold 4 tealights, I decorated mine with Graphic 45's Time To Celebrate Collection and am really pleased with how they turned out.


Wednesday, 24 December 2014

G45 - Time To Flourish Birthday Album


it's not finished yet but here are a few work in progress pictures of the Birthday Album I am making :